- 什么是Redux:Reducer+Flux
Redux 是 JavaScript 状态容器,提供可预测化的状态管理。 - Redux工作流程

我们将工作流程比作用户去图书管借书的流程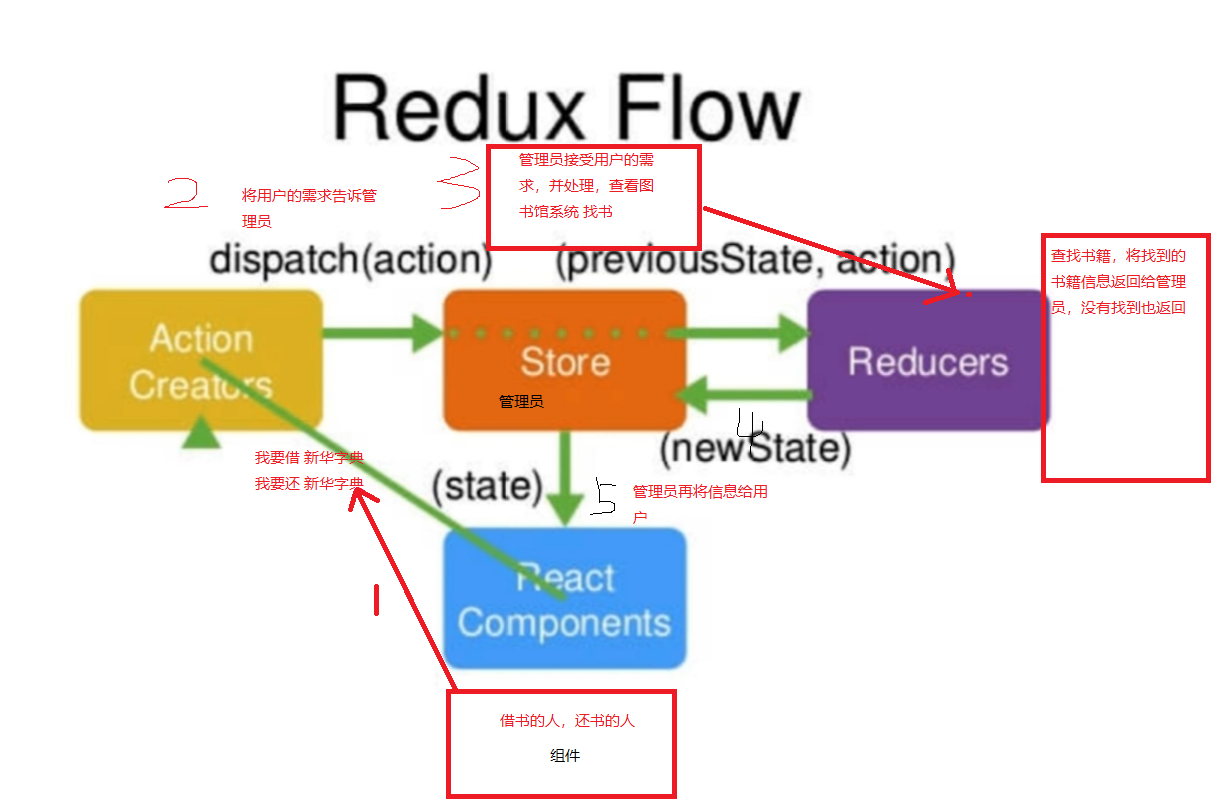
安装redux
1
2
3
yarn add redux
&&
npm i redux创建一个Store(图书馆管理员)
1
2
3
4
5
6
7
8
9
10
11
12
13
14
15
16
17
18
19
20
21
22
// index.js
import { createStore } from 'redux'
const store = createStore();
export default store
```
5. 创建图书馆系统,并将系统交给管理员
```js
// Store/reducer.js
const defaultState = {}
/*
state:上一次state中存储的数据
action:用户传递进来修改的方法
*/
export default (state = defaultState , action) => {
return state;
}
// Store/index.js
import { createStore } from 'redux'
import reducer from './reducer.js'
const store = createStore(reducer);
export default store初步的使用渲染数据
1
2
3
4
5
6
7
8
9
10
11
12
13
14
15
16
17
18
19
20
21
22
23
24
25
26
27
28
29
30
31
32
33
34
// Store/redux.js
const defaultState = {
inputValue: '',
data : [
'Japanese princess to wed commoner.',
'Los Angeles battles huge wildfires.',
]
}
export default (state = defaultState , action) => {
return state;
}
// Store/index.js
import { createStore } from 'redux'
import reducer from './reducer.js'
const store = createStore(reducer);
export default store
// todoList.jsx
import React, { Component } from 'react'
import store from '../Store/index.js'
class TodoList extends Component {
constructor(props) {
super(props)
// 也可以 this.state = store.getState()
this.state = {
inputValue: '',
// 在这里获取redux中的数据
data:store.getState().data
}
}
componentDidMount() { }
render() { }
}修改store中的数据
1
2
3
4
5
6
7
8
9
10
11
12
13
14
15
16
17
18
19
20
// todoList.jsx
// 创建修改方法 调用store.dispatch方法
handleInputChange = (e) => {
const action = {
type: 'change_input_value',
value:e.target.value
}
store.dispatch(action);
}
// reducer.js
// 接受方法 添加判断 并修改属性值
// reducer中不能修改原有的state中的值 只能先深拷贝一次
export default (state = defaultState, action) => {
if (action.type === 'change_input_value') {
const newState = JSON.parse(JSON.stringify(state));
newState.inputValue = action.value;
return newState;
}
return state;
}组件中监听redux修改了 返回最新的数据
1
2
3
4
5
6
7
8
9
10
11
12
13constructor(props) {
// 添加监听的方法
store.subscribe(this.handleChangeStore)
}
// 监听若数据修改 在组件中重新赋值
handleChangeStore = () => {
this.setState(() => {
return {
inputValue: store.getState().inputValue,
data:store.getState().data
}
})
}统一管理action
1
2
3
4
5
6
7
新建actiontypes.js
将所有的action放在这里定义并导出
组件和redux使用则单独引入
解决action拼写错误,缺不报错问题
export const CHANGE_INPUT_VALUE = 'change_input_value'
export const ADD_ITEM = 'add_item'
export const DELETE_ITEM = 'delete_item'优化代码 提高可读性方便自动化测试
1
2
3
4
5
6
7
8
9
10
11
12
13
14
// 创建 actionCreateor.js
// 将原来在组件中创建的action 统一放在此处创建
import { CHANGE_INPUT_VALUE, ADD_ITEM, DELETE_ITEM} from './actiontypes.js'
export const getInputValue = (value) => ( {
type: CHANGE_INPUT_VALUE,
value
})
export const addDataItem = () => ( {
type: ADD_ITEM,
})
export const deleteItem = (index) => ( {
type: DELETE_ITEM,
index
})一个完整的列子
1
2
3
4
5
6
7
8
9
10
11
12
13
14
15
16
17
18
19
20
21
22
23
24
25
26
27
28
29
30
31
32
33
34
35
36
37
38
39
40
41
42
43
44
45
46
47
48
49
50
51
52
53
54
55
56
57
58
59
60
61
62
63
64
65
66
67
68
69
70
71
72
73
74
75
76
77
78
79
80
81
82
83
84
85
86
87
88
89
90
91
92
93
// TodoList.jsx
import React, { Component, Fragment } from 'react'
import { Input, Button, List} from 'antd'
import store from '../Store'
import { getInputValue, addDataItem, deleteItem } from '../Store/actionCreateor.js'
class TodoListMy extends Component {
constructor(props) {
super(props)
this.state = {
inputValue: '',
data:store.getState().data // 页面加载就获取redux中存储的值
}
store.subscribe(this.handleChangeStore)// 添加redux监听 数据发生改变重新赋值
}
// input发生改变事件
handleChangeInput = (e) => {
let action =getInputValue(e.target.value)
store.dispatch(action)
}
// 监听redux属性值发生改变 冲新赋值
handleChangeStore = () => {
this.setState(() => {
return {
inputValue: store.getState().inputValue,
data:store.getState().data
}
})
}
// 添加一条数据
handleAddItem = () => {
if (this.state.inputValue === '') {
return
}
let action = addDataItem()
store.dispatch(action)
}
// 删除一条数据
handleDeleteItem = (index) => {
let action = deleteItem(index)
store.dispatch(action)
}
render() {
return (
<Fragment>
<Input style={{ width: '300px' }} placeholder="请输入内容" value={this.state.inputValue} onChange={this.handleChangeInput}></Input>
<Button onClick={this.handleAddItem} type="primay">提交</Button>
<List
style={{width:'300px'}}
bordered
dataSource={this.state.data}
renderItem={(item,index) => (
<List.Item onClick={this.handleDeleteItem.bind(this,index) } >{item}</List.Item>
) }
/>
</Fragment>
)
}
}
export default TodoListMy
// redux.js
import { CHANGE_INPUT_VALUE, ADD_ITEM, DELETE_ITEM} from './actiontypes.js'
const defaultState = {
inputValue: '',
data : [
'Racing car sprays burning fuel into crowd.',
'Japanese princess to wed commoner.',
]
}
/*
state:上一次state中存储的数据
action:用户传递进来修改的方法
*/
export default (state = defaultState, action) => {
if (action.type === CHANGE_INPUT_VALUE) {
const newState = JSON.parse(JSON.stringify(state));
newState.inputValue = action.value;
return newState
}
if (action.type === ADD_ITEM) {
const newState = JSON.parse(JSON.stringify(state));
newState.data.push(newState.inputValue);
newState.inputValue = '';
return newState
}
if (action.type === DELETE_ITEM) {
const newState = JSON.parse(JSON.stringify(state));
newState.data.splice(action.index, 1);
return newState
}
return state;
}拆分reducer
1
2
3
4
5
6
7
8
9
10
11
12
13
14
15
16
17
18
19
20
21
22
23
24
25
26
27
// store/reducer.js
import { combineReducers } from 'redux'
import headerReducer from '../common/header/store/reducer.js'
export default combineReducers({
header:headerReducer
})
// ../common/header/store/reducer.js 在这里的reducer写法与之前一样
import { CHANGE_INPUT_IS_FOCUS } from '../../../store/actionTypes.js'
const defaultState = {
focused:false,
}
export default (state = defaultState, action) => {
if (action.type === CHANGE_INPUT_IS_FOCUS) {
const newState = JSON.parse(JSON.stringify(state));
newState.focused = action.value;
return newState
}
return state
}
// 注意组件中 也要加模块名
const mapStateToProps = (state) => {
return {
focused:state.header.focused,
}
}
redux 核心API
- createStore // 创建store
createStore(reducer,window.REDUX_DEVTOOLS_EXTENSION && window.REDUX_DEVTOOLS_EXTENSION()); - store.dispatch(action) // 修改Store中属性的唯一方法
- store.getState() // 返回Store中所有的属性值
- store.subscribe() // 监听Store中有属性值发生改变 ;立即调用用户设置的方法
- combineReducers({}), // 合并多个小的reducer 返回一个大的reducer 类似vuex模块的概念
redux中间件
- 什么是redux中间件: 指的是action和store之间。即dispatch的封装和升级。
redux–redux-thunk 用户可以在action中发送异步请求获取数据(thunk将action转换成函数)
安装
1
npm install redux-thunk
使用
1
2
3
4
5
// 在创建Store的文件中引入
import { createStore, applyMiddleware } from 'redux';
import reducer from './reducer.js'
import thunk from 'redux-thunk';
const store = createStore(reducer,thunk);为了配合redux-devTools 这样使用
1
2
3
4
5
6
7
8
9
10
import { createStore, applyMiddleware,compose } from 'redux';
import reducer from './reducer.js'
import thunk from 'redux-thunk';
const composeEnhancers = window.__REDUX_DEVTOOLS_EXTENSION_COMPOSE__ ? window.__REDUX_DEVTOOLS_EXTENSION_COMPOSE__({ }) : compose;
const enhancer = composeEnhancers(
applyMiddleware(thunk),
);
const store = createStore(reducer,enhancer);发送异步请求 获取数据
1
2
3
4
5
6
7
8
9
10
11
12
13
14
15
16
17
18
19
20
21
22
23
24
25
26
27
28
29
30
31
32
// actionCreateor.js中
import { SET_DATA_LIST } from './actiontypes.js'
export const setDataList = (data) => ( {
type: SET_DATA_LIST,
data
})
export const getItemList = (index) => {
return (dispatch) => { // 第一个参数dispatch是默认的=== store.disptch
axios.get('/api/todoList')
.then(res => {
let action = setDataList(res.data)
dispatch(action)
})
.catch(error => { console.log(error);});
}
}
// reduerc.js 中 添加修改方法
if (action.type === SET_DATA_LIST) {
const newState = JSON.parse(JSON.stringify(state));
newState.data = action.data;
return newState
}
// 组件中 使用action
import { getItemList } from '../Store/actionCreateor.js'
componentDidMount() {
let action = getItemList()
store.dispatch(action)
}
// actiontypes.js 添加对应的变量
export const SET_DATA_LIST = 'set_data_list'redux-saga
- 安装
1
2
3
4
5
6
7
8
9
10
11
12
13
14
15
16
17
18
19
20
21
22
23
24
25
26
27
28
29
30
31
32
33
34
35
36
37
38
39
40
41
42
43
44
45
46
47
48
49
50
51
52
53
54
55
56
57
58
59
60
61
62
npm install --save redux-saga
```
2. 使用
```js
// Store中添加saga配置
import { createStore, applyMiddleware,compose } from 'redux';
import reducer from './reducer.js'
import createSagaMiddleware from 'redux-saga'
import todoSaga from './sagas.js'
const sagaMiddleware = createSagaMiddleware()
const composeEnhancers = window.__REDUX_DEVTOOLS_EXTENSION_COMPOSE__ ? window.__REDUX_DEVTOOLS_EXTENSION_COMPOSE__({ }) : compose;
const enhancer = composeEnhancers(
applyMiddleware(sagaMiddleware),
);
const store = createStore(reducer, enhancer);
sagaMiddleware.run(todoSaga)
export default store
// 在组件中使用
import { geiInitList } from '../Store/actionCreateor.js'
componentDidMount() {
let action = geiInitList()
store.dispatch(action)
}
// 添加自定义saga 用来存放异步亲求数据的方法
// saga也可以监听action的type值 与redux一样
import { put, takeEvery } from 'redux-saga/effects'
import { GET_INIT_LIST } from './actiontypes.js'
import { setDataList } from './actionCreateor.js'
import axios from 'axios'
// saga监听action的类型 是GET_INIT_LIST(get_init_list)就会调用getInitList方法
function* todoSaga() {
yield takeEvery(GET_INIT_LIST, getInitList);
}
// 调用本方法后 获取到的数据 使用put方法返回给redux.js
function* getInitList() {
const res = yield axios.get('/api/todoList');
let action = setDataList(res.data)
yield put(action)
}
export default todoSaga;
// reducer.js
// 判断action的类型 进行数据修改
if (action.type === GET_INIT_LIST) {
const newState = JSON.parse(JSON.stringify(state));
newState.data = action.data;
return newState
}
// actionCreateor.js
// saga 使用的action
export const geiInitList = () => ( {
type: GET_INIT_LIST,
})
// actiontypes.js
export const GET_INIT_LIST = 'get_init_list'
- 安装
react-redux的使用
安装 react-redux
1
npm i react-redux
创建redux数据仓库(store)
1
2
3
4
import { createStore } from 'redux'
import reducer from './reducer.js'
const store = createStore(reducer)
export default store在渲染的父组件中(App.js)
1
2
3
4
5
6
7
8
9
10
import React from 'react'
import store from '../Store/index.js'
import { Provider } from 'react-redux'
import TodoList from './TodoList/TodoList.jsx'
const App = (
<Provider store={store}>
<TodoList></TodoList>
</Provider>
)
export default App在TodoList中使用(TodoList.jsx)
1
2
3
4
5
6
7
8
9
10
11
12
13
14
15
16
17
18
19
20
21
22
23
24
25
26
27
28
29
30
31
32
33
34
35
36
37
38
39
import React,{ Component } from 'react'
import store from '../Store/index.js'
import { connect } from 'react-redux'
class TodoList extends Component {
render() {
return (
<Fragment>
<div>
<input onChange={this.props.handleChangeInputValue} placeholder="请输入内容" value={this.props.inputValue} />
<button>提交</button>
</div>
<ul>
<li>dell</li>
</ul>
</Fragment>
)
}
}
// 获取store中的数据 在这里定义数据 jsx中就可以使用this.props.inputValue方式显示
const mapStateToProps = (state)=>{
return {
inputValue:state.inputValute // 从redux中获取inputValue
}
}
// store.dispatch 将修改redux的方法放在这里 jsx即可使用this.props.handle 使用
const mapDispatchProps = (dispatch)=>{
return {
handleChangeInputValue(e){
let action = {
type: 'change_input_value',
value:e.target.value
}
dispatch(action)
}
}
}
// connect 会自动监听 不需要我们在使用subscribe 方法了
export default connect(mapStateToProps, mapDispatchProps)(TodoList)创建reducer.js 并添加对应的方法 修改store中数据
1
2
3
4
5
6
7
8
9
10
11
const defaultState = {
inputValue:''
}
export default (state=defaultState, action)=>{
if(action.type === 'change_input_value'){
const newState = JSON.parse(JSON.stringify(state));
newState.inputValue = action.value
return newState
}
return state
}
immutable.js的使:使store 变成不可更改的对象
安装
1
yarn add immutable
使用
1
2
3
4
5
6
7
8
9
10
11
12
13
14
15
16
17
18
19
20
21
22
23
24
25
26
27
28
// header.reducer.js
// 引入immutable 并将初始数据转换成immutable对象
import { CHANGE_INPUT_IS_FOCUS } from './actionTypes.js'
import { fromJS } from 'immutable'
const defaultState = fromJS(
{
focused:false,
}
)
export default (state = defaultState, action) => {
if (action.type === CHANGE_INPUT_IS_FOCUS) {
// const newState = JSON.parse(JSON.stringify(state));
// newState.focused = action.value;
// return newState
// state.set()方法是将原来的数据与新的数据对比 返回一个全新的对象
return state.set('focused',action.value)
}
return state
}
// 在组件中使用
// 不需要在引用immutable
const mapStateToProps = (state) => {
return {
focused:state.header.get('focused'),
}
}Api锦集
1
2
3
4
5
6
xxx.formJS() // 将js转换成immutable对象
xxx.get('属性').get('') // 获取属性值
xxx.getIn(['模块','属性']) // 获取属性值
xxx.toJS('') // 将immutable对象转成js对象
xxx.set('属性',"值").set('属性',"值") // reducer.js 中修改一个state中的值
xxx.merge({}) [([])], // reducer.js 中修改多个state中的值 可以用对象的形式 多个set用merge性能能高
缺点:immutable只是将reducer中的数据转换成immutable对象 但是在组件中使用 获取数据的时候
focused:state.header.get(‘focused’), 是先调用js对象 再去调用immutable对象中的属性值
解决办法:统一成immutable对象 使用redux-immutable库
使用redux-immutable管理数据
安装
1
yarn add redux-immutable
使用
1
2
3
4
5
6
7
8
9
10
11
12
13
14
15
16
// 在总的reducer.js中 将原来import { combineReducers } from 'redux' 更换为以下方式
import { combineReducers } from 'redux-immutable'
import headerReducer from '../common/header/store/reducer.js'
export default combineReducers({
header:headerReducer
})
// 组件中获取值
const mapStateToProps = (state) => {
return {
// 二种方式都可以
focused:state.get('header').get('focused'),
// focused:state.getIn(['header','focused'])
}
}
react-router-dom react路由的使用
安装
1
yarn add react-router-dom
使用
1
2
3
4
5
6
7
8
9
10
11
12
13
14
15
16
17
18
19
20
21
// App.js
import { BrowserRouter, Route} from 'react-router-dom'
function App() {
return (
<Provider store={store}>
<>
<Header></Header>
// 路由包裹器他下面只能有一个子元素
<BrowserRouter>
<>
// path="/" 路径
// exact 匹配路径与url一直才会显示
// render() 需要渲染的组件
<Route path="/" exact render={() => <div>home</div>}></Route>
<Route path="/details" exact render={() => <div>details</div>}></Route>
</>
</BrowserRouter>
</>
</Provider>
);
}常用Api
- BrowserRouter: 路由包裹器 包裹Route
- Route: 路由
- path: 路由地址
- exact: 匹配路径与url一直才会显示
- render:渲染的页面
- component: 渲染的组件 传组件
- Link 用户路由跳转
- to:路由地址
- withRouter:多层级页面 获取路由传递的参数 组件套组件 路由参数只能在路由组件中获取 使用withRouter可以使子组件也能获取到路由参数
- export default connect(mapState,mapDispatch)(withRouter(Detail)) 使用方法
- Redirect: 路由重定向
安装
1
yarn add react-loadable
使用
1
2
3
4
5
6
7
8
9
10
11
12
13
14
15
16
import Loadable from 'react-loadable';
import React from 'react'
const LoadableComponent = Loadable({
// 加载组件
loader: () => import('./index.js'),
// 组件还没有加载好显示的提示信息
loading() {
return <div>正在加载</div>
}
})
export default ()=> <LoadableComponent></LoadableComponent>
//在引入路由组件的地方更改下 引入异步组件 如果路由传参数了 请记得使用withRouter:多层级页面
// import Detail from './pages/detail/index'
import Detail from './pages/detail/loadable.js'